Features
Metadata Storage Search and Filtering End-to-end Data Objects Lineage End-to-end Microservices Lineage Data Quality Test Results Import Alerting ML Experiment Logging Manual Object Tagging Data Entity Groups Data Entity Report Dictionary Terms Activity Feed for Monitoring Changes Dataset Quality Statuses (SLA) Dataset Schema Diff Associating Terms with Data Entities through Descriptive Information Adding Business Names for Data Entities and Dataset Fields Integrating Vector Store Metadata Query Examples Data Quality Dashboard Data Quality Dashboard Filtering Filters to Include and Exclude Objects from Ingest Data Entity Statuses Alternative Secrets Backend Lookup Tables Integration Wizards Data Entity Attachments Machine-to-Machine (M2M) tokens
Metadata Storage
The Storage is a data catalog which gathers metadata from your sources. Data processing is based on the near real-time approach. A storage space is not limited. ODD & PostgreSQL provide saving metadata, lineage graphs and full text search, so extra integrations (Elasticsearch, Solr, Neo4j etc.) are not required.
Search and Filtering
With our user friendly search interface finding the information you need is easier than ever. All you have to do is type your search query into the search bar and ODD will do the rest.
To get started simply navigate to the main page of ODD Platform and select the Catalog tab. There you’ll find the Search bar and Filter options.
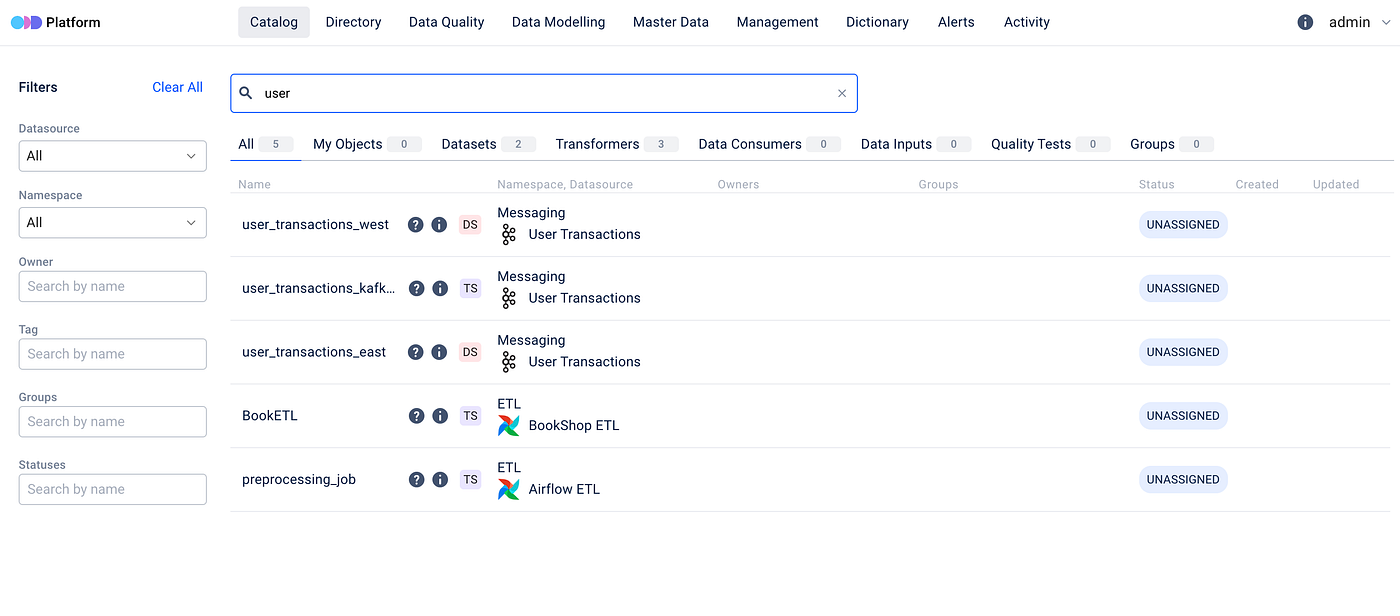
We’ve taken a step forward by incorporating faceted search capabilities. This means that you can refine your search results based on specific attributes, ensuring that you find exactly what you are looking for.
We also provide filtering options allowing you to further customize your search criteria.
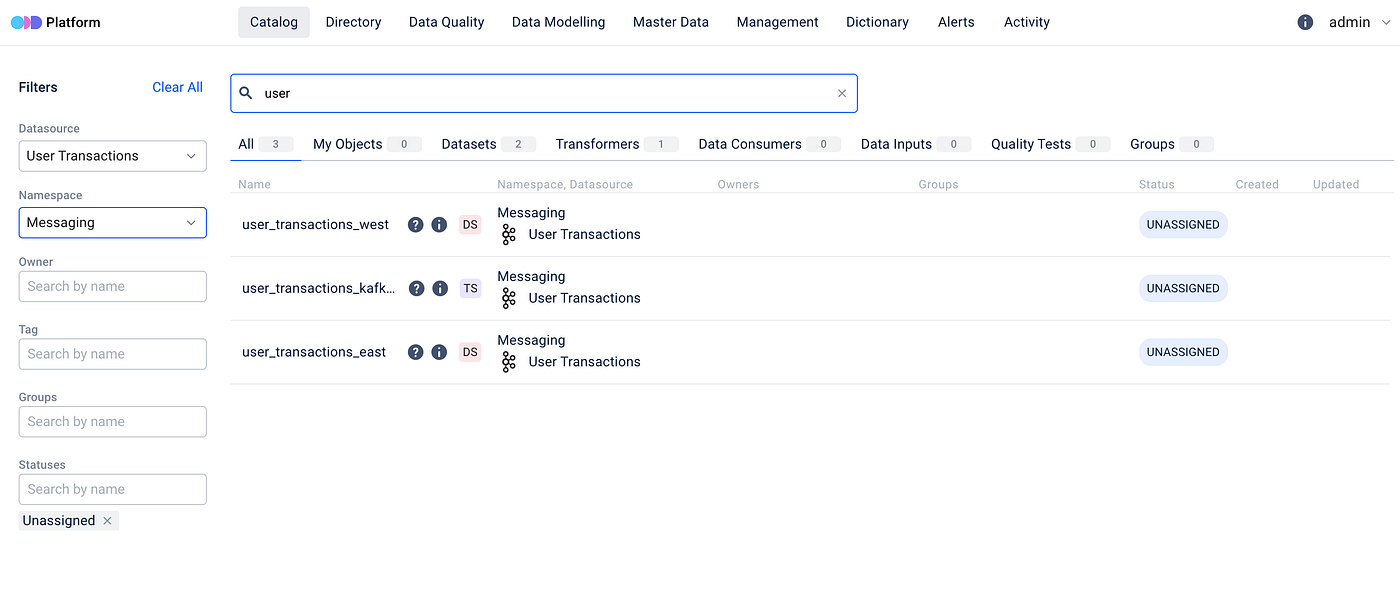
Whether it is by datasource, owner or tag, you have full control over how you want to narrow down your search results.
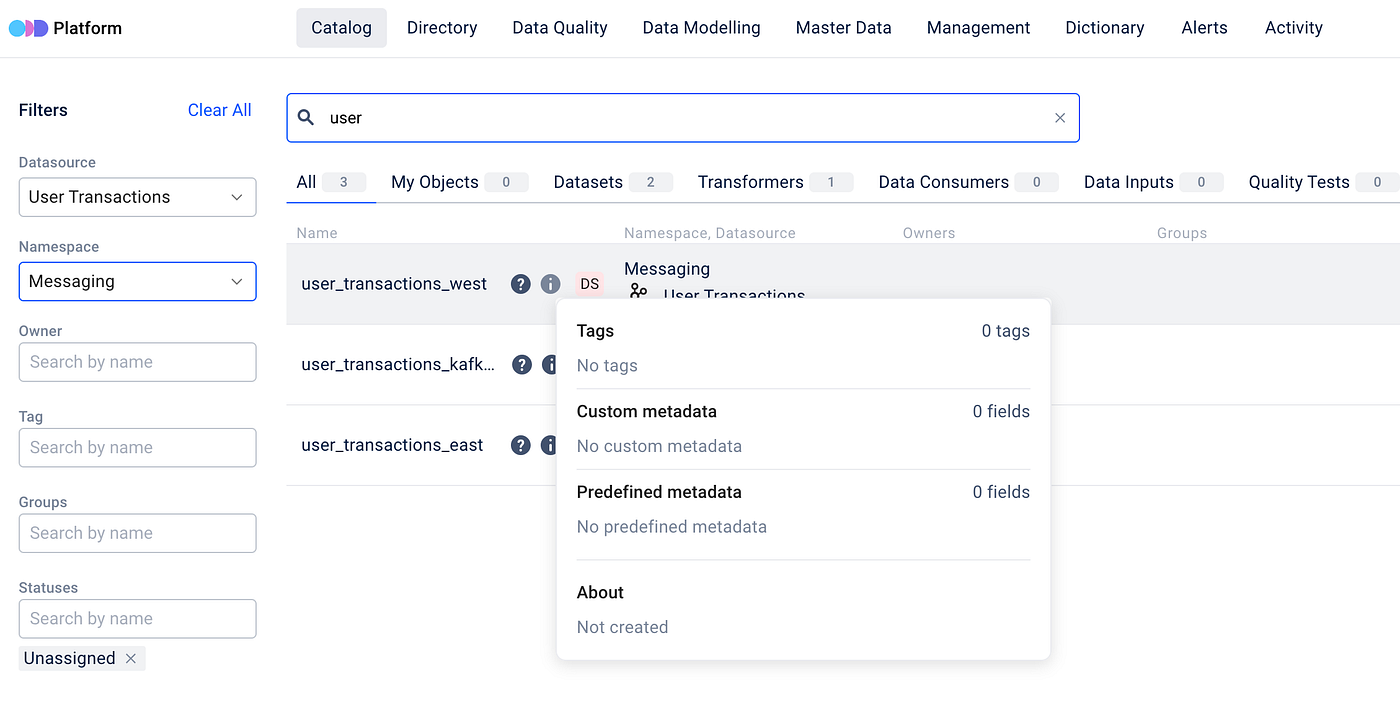
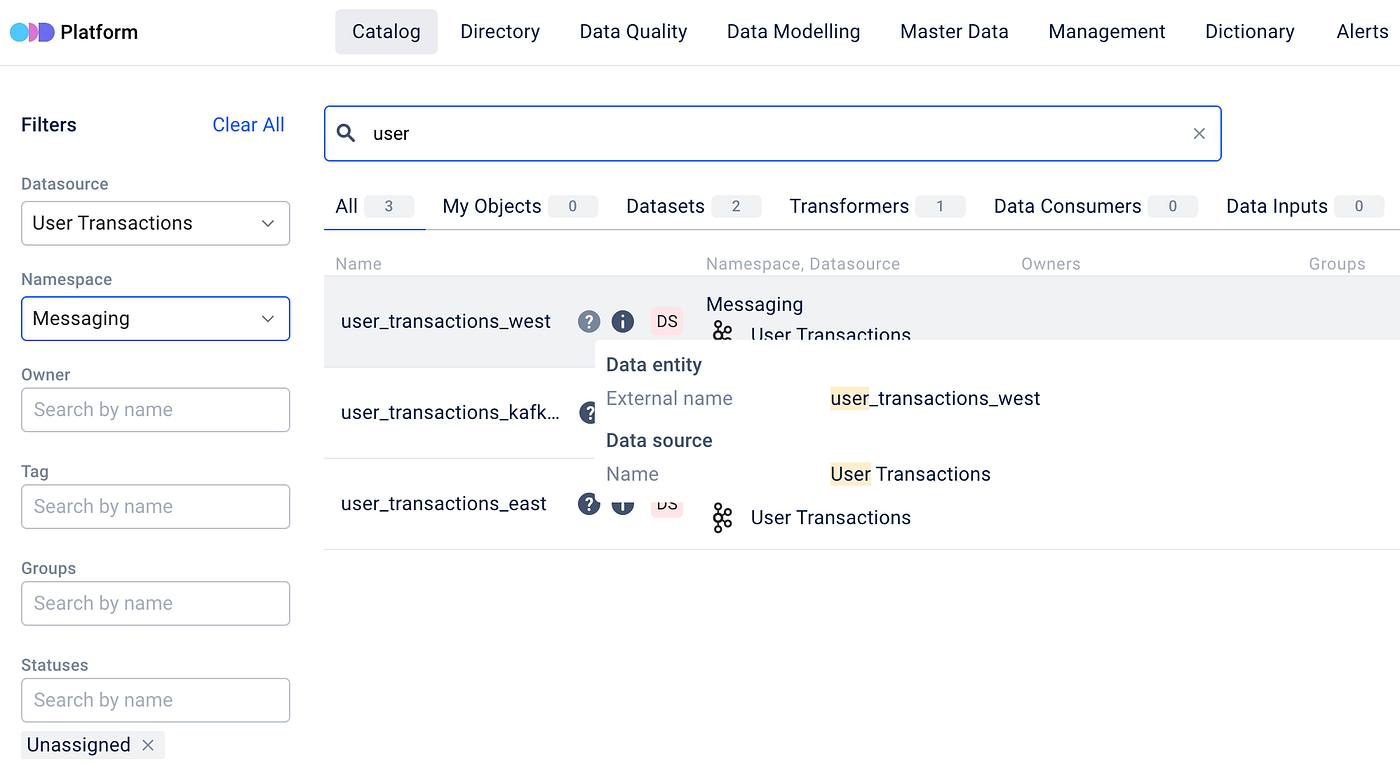
As you type your search and adjust filters, ODD dynamically responds to your search delivering results in seconds. Each entity in the search results is accompanied by an information and a question icons, offering additional clarity and insight:
Technical details
Let’s explore the technical details .
Step 1. Metadata ingested into the platform goes through indexing to improve search efficiency.
Step 2. When you search or apply filters, the search engine processes your inputs by recognizing search terms, applying relevant constraints and identifying metadata entries closely rated to the query.
Step 3. Next, the ODD Platform ranks these matching metadata entries based on a specific criteria and their relevance to your search.

The search and filtering are available not only in the Catalog tab, but in Query examples, Master Data, Management and Dictionary tabs as well.
End-to-end Data Objects Lineage
The Platform supports a lineage diagram, so you can easily track movement and change of your data entities. ODD supports the following data objects:
Datasets
Data providers (third-party integrations)
ETL and ML training jobs
ML model artifacts and BI dashboards
Read more about how these entities are used in the ODD Data Model.

End-to-end Microservices Lineage
This feature helps trace data provenance of your microservice-based app. ODD represents microservices as objects and shows their lineage as a typical diagram. The picture below shows the process of metadata ingestion.

Data Quality Test Results Import
Monitor test suite results in the Platform and at the same don't think about masking or removing sensitive data. Your datasets don't migrate to your ODD Platform installation, it gathers test results only. The Platform is compatible with Pandas and Great expectations.

Alerting

Whenever an issue arises with an Entity such as a failed job, the platform generates an alert visible in the Alerts section.
or on the Data Entity page:
For each notification, details such as the data entity name, alert type, alert date, history and a resolution button are available. Resolving an alert updates the information accordingly.
The platform utilizes PostgreSQL replication mechanism to ensure notifications are sent even in the event of network lag or platform crashes, requiring configuration of the underlying PostgreSQL database.
We track several types of alerts, including:
failed jobs;
failed data quality tests;
backwards incompatible schema changes;
distribution anomalies.
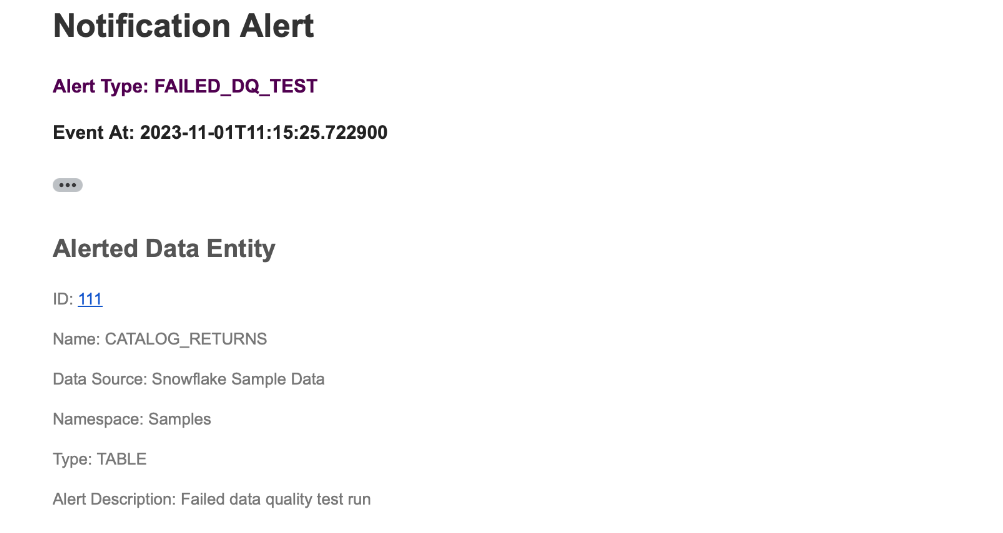
These alerts can be sent via Slack, Webhook and/or email, serving as a notification that something requires attention.
For webhook notifications users need to specify an endpoint to receive HTTP POST requests.
For email notifications users need to place the recipient’s email address and configure SMTP details (Google SMTP, AWS SMTP, etc) including sender and receiver information and the SMTP server’s hostname.
For Slack notifications users need to add the Slack webhook URL and specify the channel or recipient for receiving notifications.
With these setup options, ODD users can seamlessly integrate alerting mechanisms into their preferred workflow channels.
Setting up alert types
Alert notifications within Open Data Discovery are customizable. Users can choose the type and period to receive alert notifications with ease. This setup requires hitting the Notification Settings button and configuring it.
It is also possible to turn off notifications for specific data entity for a chosen time ranging from half an hour to one week.
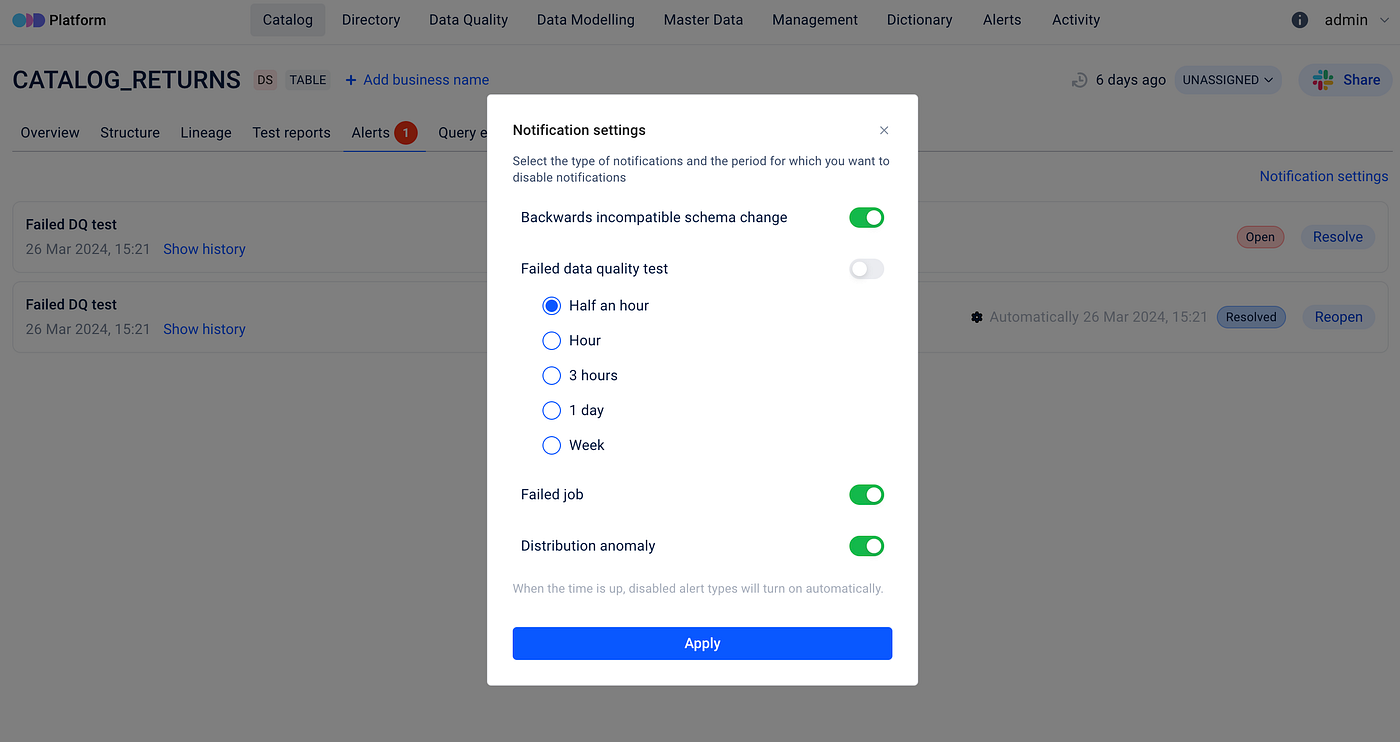
Setting up alert notifications
For setting up the alert notifications within the platform all required variables must be defined in configuration files. And here is how an email notification may look like:
Cleaning Up
ODD users can easily disable Alert Notification functionality by following several steps described in configurations.
It is important to know, that if users chose to set the enabled parameter to false, then they also need to remember to also configure the database so it doesn’t save logs for notifications. Otherwise, the database will end up with extremely large logs of events that haven’t been processed.
ML Experiment Logging
The Platform helps track and compare your experiments. It enables you to:
Explore a list of your experiment's entities (tables, datasets, jobs and models)
Log the most successful experiments

Manual Object Tagging
Manage your metadata by tagging tables, datasets and quality tests. Tags provide easy filtering and searching.
Tag both tables and each column
You may apply tags to data assets and columns of datasets.

Data Entity Groups
Create groups to gather similar entities (datasets, transformers, quality tests, etc). Each group may be enriched with specific metadata, owners and terms.
Example: an organization has ingested metadata related to its finances into the ODD Platform. All the entities are united into the Finance Namespace by default. To categorize entities, one creates Revenue and Payrolls groups.

Data Entity Report
A report collects statistical information about data entities on the main page of the Platform. It represents:
Total amount of entities
Counters for Datasets, Quality Tests, Data Inputs, Transformers and Groups
Unfilled entities that have only titles and lack metadata, owners, tags, related terms and other descriptive information

Dictionary terms
Give an extra information about your data entities by creating terms that define these entities or processes related to them. You may see all terms connected to a data entity on its overview page. All created terms are gathered in the Dictionary tab.

Activity Feed for Monitoring Changes
Track changes of your data entities by monitoring the Activity page or Activity tabs placed on pages of data entities. Also, to search needed changes, you may filter events by datasources, namespaces, users and date.
Event types:
CREATED– a data entity, data entity group or a descriptive field related to a data entity was created.DELETED– a data entity, data entity group or a descriptive field related to data entity was deleted.UPDATED– an existing data entity or a descriptive field related to data entity was edited.ADDED(ASSIGNED) – an existing tag or term was linked to a data entity.

Dataset Quality Statuses (SLA)
Use Minor, Major and Critical statuses to mark dataset's test suite results depending on how trustworthy they are. Then you may easily import these statuses directly to a BI report:
Go to the dataset main page and select the Test reports tab.
Click on a job and then, on the right panel, select a status.
To add the status into your BI report, use the following URL:
https://{platform_url}/api/datasets/{dataset_id}/sla
Result: statuses are displayed in the BI-report as color indicators (Minor = green, Major = yellow, Critical = red).
Dataset schema diff
Simplifying Dataset Schema Comparison: With ODD feature “Schema Diff” comparing dataset structures has become more user friendly and efficient. Now, you can effortlessly identify differences between two dataset revisions using our UI.
For a more detailed look, let’s navigate to the Structure page of any Dataset (e. g. Table, File, View, Vector Store, etc.).
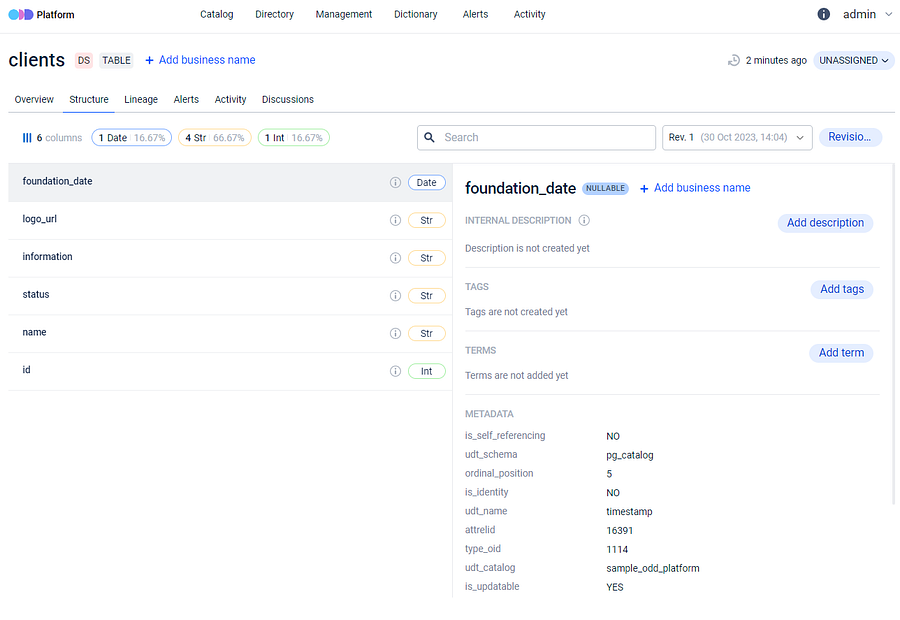
Here you can examine the dataset schema, including its fields, data types and available statistics for each field.
Exploring the Schema Diff feature: Currently, there isn’t a one-size-fits-all solution, but one option is to monitor alterations in the dataset’s structure directly within the platform.
Moreover, the Activity feature serves as a tracking system for different changes functioning as an audit log for various types of manipulations on data assets. This may include tasks like assigning terms and updating descriptions. Finding Activities is straightforward through the main menu and it is worth mentioning that each entity also has its dedicated list of changes accessible on the Activity tab.
Let’s clarify the concept of dataset structure revision.
This means that at any given moment, you can review dataset column changes, data type changes for any dataset, and you can also identify differences between any two versions (revisions) of the dataset’s structure.
ODD monitors schema changes whenever metadata is added through adapters. Addition of new columns, deletion, renaming or modifications of data types initiates a new revision creation.
Moreover, as soon as the Platform identifies modifications that are not compatible with previous versions or, in other words are backward incompatible, such as removing column, altering its name or changing data type, an alert is being triggered by the system.
This ensures timely notification on potential changes that can impact downstream processes each time the adapter initiates, preventing users from discovering alterations when attempting to use the data.
Additionally, a new dataset version is added to the revision history and you can easily compare dataset revisions using our user friendly interface, displaying all changes in detail.
You can see in the illustrations below how the platform highlights modifications in dataset schema when a column is either added or removed.
It’s important to emphasize that this feature is capable of monitoring and visually representing modification of data type and column renaming in dataset.
Associating Terms with Data Entities through Descriptive Information
Adding Business Terms to the Dictionary: Initially, it’s necessary to add relevant business terms to the platform’s Dictionary. These terms can be associated with specific data entities or columns.
As already mentioned above, the Dictionary Terms section primarily serves to define and provide context for data entities. For instance, if a data asset relates to “Customer Analytics”, the associated business term can signify its alignment with the customer analytics domain.
Ownership and Privileges: An essential part of this feature is the capacity to designate an owner for a business term. This owner holds the authority to create, approve edits and delete the associated entity, contributing to the relevance of those descriptions.
An About feature inspired by Wikipedia: The central concept behind the development of this feature draws inspiration from the user-friendly functionality found on Wikipedia — an About section.
As soon as the term was introduced into the dictionary, users can navigate to the About section and craft a concise term description using a rich formatting toolbar.
Linking and describing terms: The terms mentioned in description text can then be linked to the previously established business term, using the required format for linking. When users hover the cursor over an information icon, it triggers the highlighting effect, illuminating the text format that should be used to link the text to a specified term.
Updated Dictionary Terms section: Once created and saved, the business term becomes accessible in the Dictionary Terms section. Successful creation of the link will be indicated by a notification in the bottom right corner of the screen.
Before linking terms, it is essential to have previously created them and established a corresponding Namespace in the Dictionary. Please adhere to the specified formatting requirements and be mindful of spaces. If the term or Namespace is not defined in the Dictionary, a notification will appear around the About section.
The identical feature for columns: Users are able to associate terms not only with the dataset as a whole but also with the individual columns. To try it, the user may go to the Structure section, choose the desired Column, or proceed with the automatically selected one and provide a description in the same manner as described earlier.
After saving the description and associating it with the relevant term, the linked term will appear directly below in the Terms section.
This feature provides users with a convenient way to reach all the business terms available on the platform.
Reverse search functionality: It’s important to note that connecting items to data entities enables a reverse search capability. Users can easily verify which entities and columns have previously been linked to a specific term.
If the user clicks on the term, a window containing the relevant information will be displayed on a user’s screen.
Important Note: The history of numerous actions within the platform are accessible in the Activity section, including the creation and linking of terms.
Adding Business Names for Data Entities and Dataset Fields
Renaming datasets and data items becomes a seamless process through the ODD UI. This feature empowers users to allocate names that accurately represent the nature and purpose of the data, thereby enhancing accessibility and usability.
Step 1. Users initiate the process by selecting the Add Business Name button for the dataset they want to rename.
_Step 2._They then input a preferred name in the Business Name section and confirm it to evaluate the dataset’s renaming.
Step 3. Upon completion, users can view the newly assigned name for the dataset.
📌Additionally, the original name persists below the newly selected one, serving as a reference for the dataset’s original name.
📌Notably, all these functionalities are also applicable to dataset columns, following the same logic for renaming with corresponding steps.
Integrating Vector Store Metadata
We’ve enhanced the ODD Platform to better manage Vector Metadata, focusing on integration efficiency and improved data handling. This enhancement includes: 1. New Dataset Type — ‘Vector Store’: ‘Vector Store’ has been introduced as a new dataset type in the ODD Platform, specifically to categorize and manage datasets that primarily handle vector data. This development aligns with our platform’s specifications, facilitating a more streamlined approach for ingesting and navigating vector data.
2. New Data Type — ‘Vector’: In addition to the new dataset type, we have added ‘Vector’ as a new data type. This enhancement is crucial for accurately handling and categorizing vector-type data during metadata ingestion.
All these changes are reflected first in the Specification.
The first implemented integration with a Vector Store from the collectors’ perspective is the enhancements made to the ODD Collector with PostgreSQL adapter. This adapter has been enhanced to integrate with PostgreSQL’s pgvector extension. In case when a PostgreSQL table contains at least one column with a vector data type, our adapter recognizes this table as a Vector Store during the ingestion process.
Query Examples
We have introduced a feature that provides the opportunity to store query examples within ODD Platform. In fact, this also serves as a crucial aspects of data modeling: a contract of how to use the data.
With ODD platform users not only have the ability to store your query examples, but can also enrich them with a definition that could play a role of “prompt”.
These descriptions provide a comprehensive understanding of the purpose and methodology behind each query example. And for sure it is possible to link mentioned queries with associated data entities (e. g. tables, views, files).

It is worth mentioning, that all the data integrated into the platform is available also with the API , which means it is possible to search, extract and update all the data programmatically.
Data Quality Dashboard
Quality checks aren’t performed directly within ODD Platform - we provide tools through integrations with leading tools in the field. On top of that we’ve developed a Data Quality Dashboard that builds on integrated quality check results.

What we observe here are data quality metrics which are dimensions representing diverse characteristics of data that are used to evaluate and measure its overall quality:\
Assertion Tests: these are validations or checks put in place to ensure that specific conditions or assertions about the data are met.
Custom Values Anomalies: these anomalies involve irregularities or unexpected values in the data that deviate from a predefined set of acceptable or standard values.
Freshness Anomalies: these anomalies are related to the timeliness of the data, checking whether the data is up to date and falls within the acceptable time frame.
Schema Changes refers to the modifications in the structure or organization of the data, with a focus on monitoring whether the data schema remains consistent over time.
Unknown Category represents a situation where data is placed into a category that was not foreseen or specified in the established data model or schema.
Volume Anomalies involve checking for unexpected changes in the quantity or volume of data.
For each of these metrics we assign statuses to the checks, distinguished by colors for better visualization:

Additionally, we provide information on what portion of the data was monitored and what part was skipped.
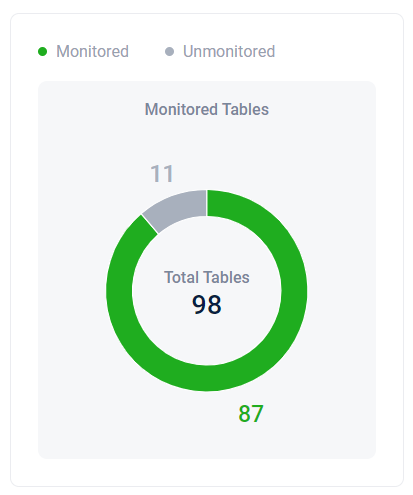
This specifically applies to Table type datasets.
Data Quality Dashboard Filtering
ODD, users can filter the results of quality tests on the dashboard by various criteria such as Namespace, Datasource, Owner, Title and Tag.
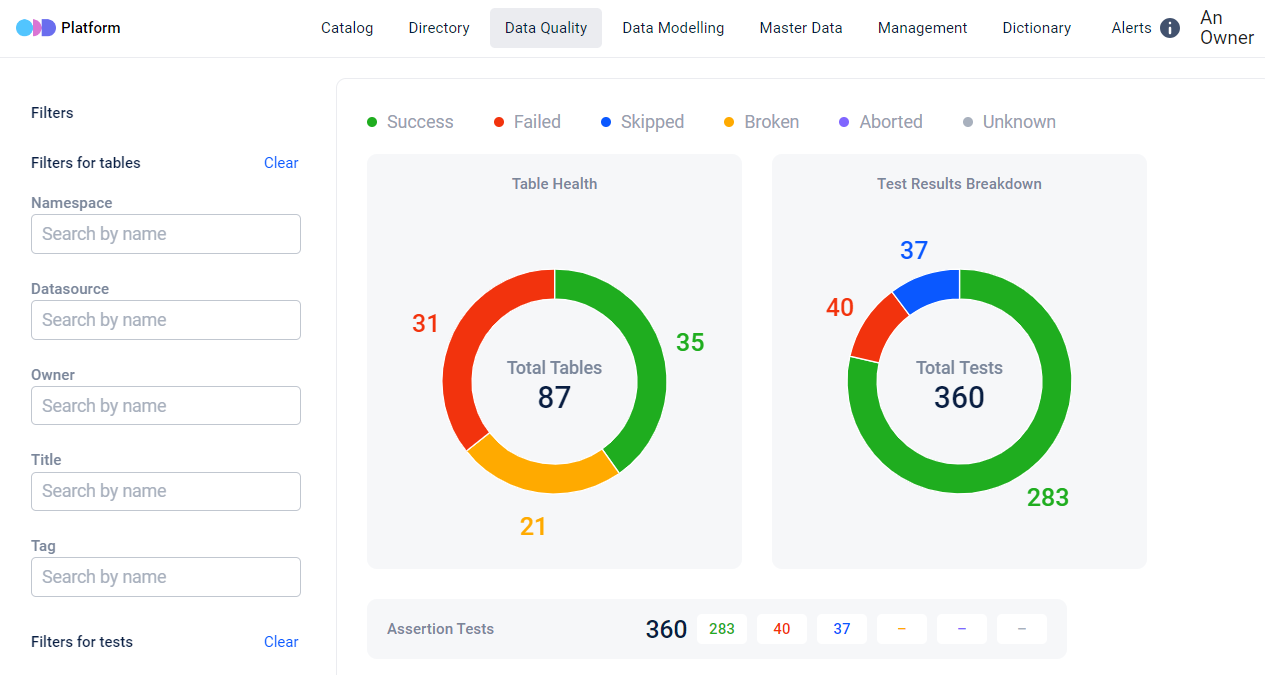
These filters not only apply to tables based on related attributes but also to tests based on their own attributes.
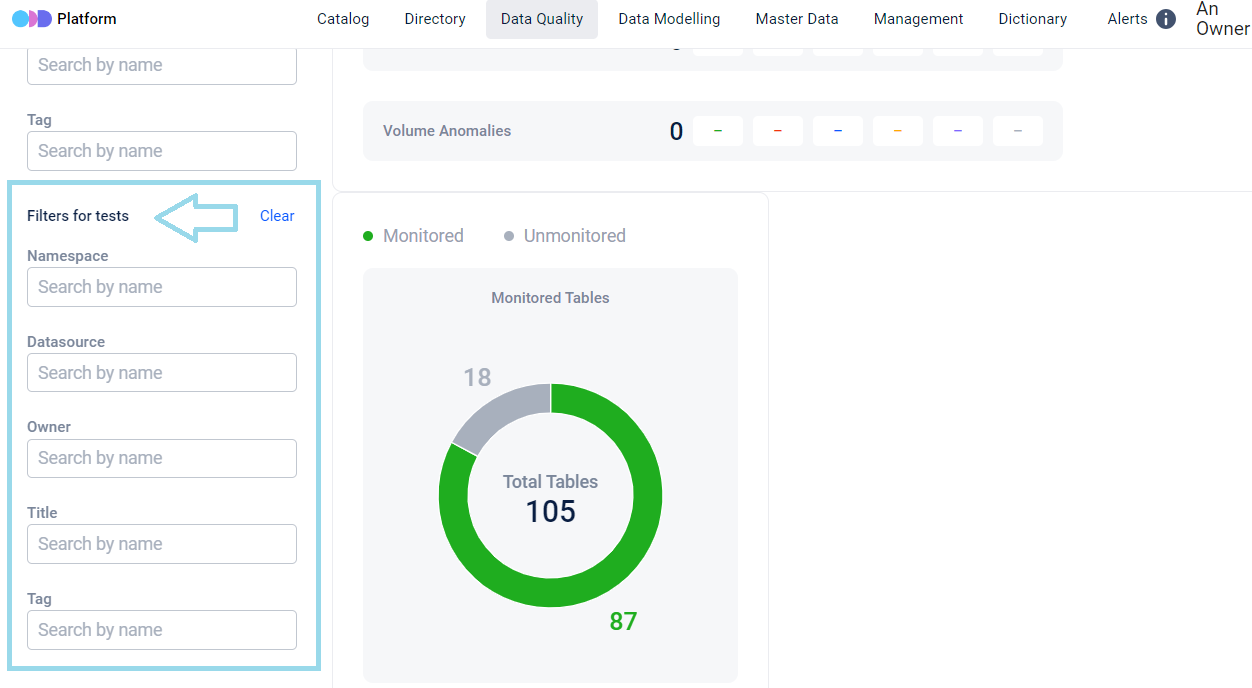
ODD users can narrow down test results for datasets by multiple attributes simultaneously.
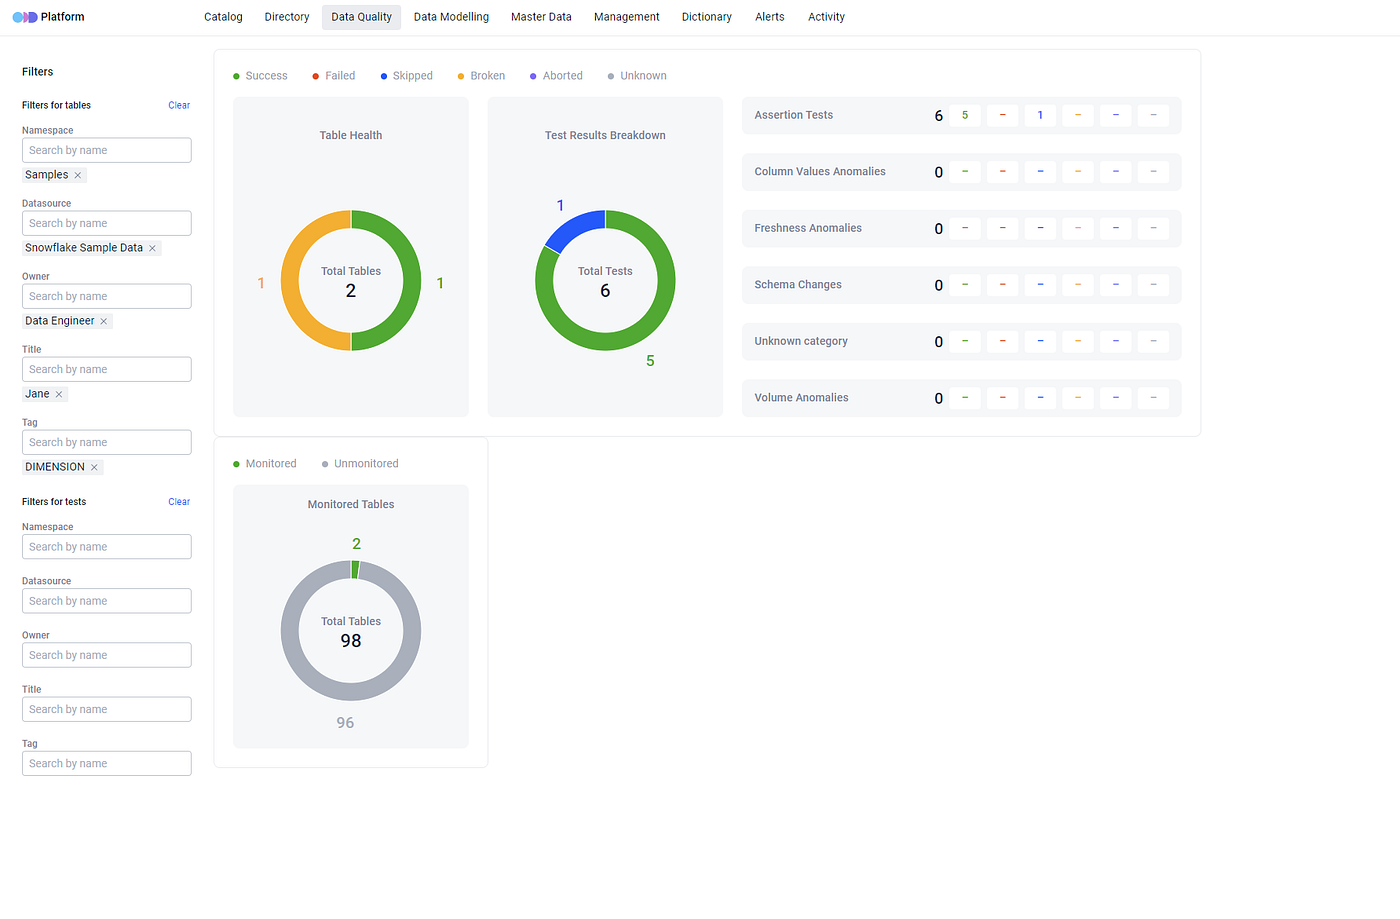
It’s worth noting that, for simplicity, we’ve currently implemented only one logical conjunction in this feature, which is AND. So, the results user see after filtering are the outcome of several AND conjunctions.
Filters to Include and Exclude Objects from Ingest
To improve the accuracy and efficiency of the metadata collection process, we recommend utilizing ODD Filtering functionality. This feature plays a crucial role in customizing the metadata collection, enabling a focused and efficient approach that reduces the retrieval of unnecessary data. Integrating filters is simple process, requiring only a few lines of configuration. The only requirement for filter configuration is that the specified patterns for inclusion and exclusion should be valid regular expression patterns or a list of such patterns.
Here is an illustration with a practical example using a set of sample database schemas within PostgreSQL:
test_prod
application_dev
data_in_prod
test_data_in_prod_for_application
By adding the following lines to the PostgreSQL Plugin:
The Collector will selectively ingest objects from schemas matching at least one pattern from the inclusion list (1) while avoiding any schemas matching at least one pattern from the exclusion list (2). So in this particular example:
“test_prod” schema will be filtered out by the rule ‘prod$’;
“application_dev” doesn’t match any inclusion rule;
“data_in_prod” is excluded by ‘prod$’;
“test_data_in_prod_for_application” will be the only schema that will be taken into account by the collector.
Note: filtering configuration is optional and if not to configured, Collectors will retrieve all available metadata from the source.
To explore the full range of Collectors for which we’ve developed filtering options, please visit our Github page and feel free to delve into the details and tailor filtering configurations to suit your specific requirements.
Data Entity Statuses
UNASSIGNED is the default status: when metadata collectors ingest data entities into platform databases, the default status for all entities is automatically being set as UNASSIGNED.
To improve data management ODD users have the flexibility to modify the default status.
DRAFT status indicates that the data entity is a draft or test entity in the data source. The ODD UI provides an option to specify a time period after which the status will transition to DELETED.
STABLE status denotes that the data entity is stable and fully operational.
DEPRECATED status serves as a warning that a specific entity is deprecated. The ODD UI here also provides the opportunity to set a time period after which the status will be changed to DELETED.
DELETED status highlights that a specific entity is going to be deleted from the Management page and can be accessed only through filtering the deleted items.
A Time-to-Live (TTL) mechanism is implemented by housekeeping.ttl.data_entity_delete_days for a data entity with the DELETED status. The default soft deletion period is 30 days, during which the status can be modified to prevent permanent deletion after the soft deletion period expires.
Crucial Points to Note
If the status of the data entity and its source is set to DELETED, modifying the entity status to visible state will revert the data source to its original condition.
Status assignments are applicable not only for individual data entities but also extend to groups, providing the choice to apply the change to the entire group.
Status information is visible on the Catalog page, allowing users to employ filters for organizing data items according to their preferred status.
Status changes information is visible on the Activity page.
Alternative Secrets Backend
We have an alternative way of how to store Collector configuration using the Secrets Backend approach. Currently only AWS Parameter Store is supported.
Example of configuring backend section for AWS Parameter Store:
provider: Mandatory parameter, without default value.region_name: Optional parameter, without default value, but has more complex retreiving logic sequence:The highest priority is given to the environment variable
AWS_REGION; if specified, its value will be used.If no
AWS_REGIONis provided, the information fromcollector_config.yamlwill be used.If
region_nameis not specified, we attempt to retreive AWS region information from the Instance Metadata Service (IMDS).If none of the above methods work, the adapter will throw an error, as we cannot instantiate the connection to the service.
collector_settings_parameter_nameandcollector_plugins_prefix: Optional parameters with default values. You may skip them if the default naming suits your needs.
If you are exclusively using a local collector_config.yaml file for configuration and have no plans to use any of the supported backends, you may skip the secrets_backend section by deleting it or leaving it commented.
Lookup Tables
The creation of Lookup Tables involves adding a new table through the +Add new button in the right upper corner of the Master Data section.
On a physical level, this implies that an actual table will be generated by ODD using the specified configuration connection. These tables are entirely managed by the ODD Platform.
When a Lookup Table is created a Data Entity of type “lookup table” is generated.
The Table name entered during creation is assigned to it as a Business Name. Simultaneously, an Original Name is provided, prefixed with the ID of Namespace. This prefix is added to distinguish tables with potentially identical names and it ensures that the tables adhere to a format acceptable for PostgreSQL.
The Original Name of Lookup Table functions as a table identifier within PostgreSQL, allowing it to be identified by the users. This information is useful when tasks such as uploading the table elsewhere or establishing a direct connection to the table data are required.
Lookup Table’s Structure
The creation of the Lookup Table structure starts with column creation on a Structure Tab. Column creation starts with +Add column button and requires the specification of Column Name.
In contrast to the Table Name, which can assume any format, the right selection of name at this stage is crucial and adhering to a specific format is considered essential.
Further, the creation of Descriptions occurs at this point. Essentially, the columns that will be generated within the current table are the focus of these descriptions. The final step in creating a column involves selecting a Data Type. Currently, a limited list of PostgreSQL data types is supported for columns, with plans to broaden this list in the future with the introduction of new components. Once the Table Name, Description and Data Type are provided, the column is created by clicking on the Add column button.
It is possible to further edit, i.e. to rename column or edit the description for that column, or delete columns:
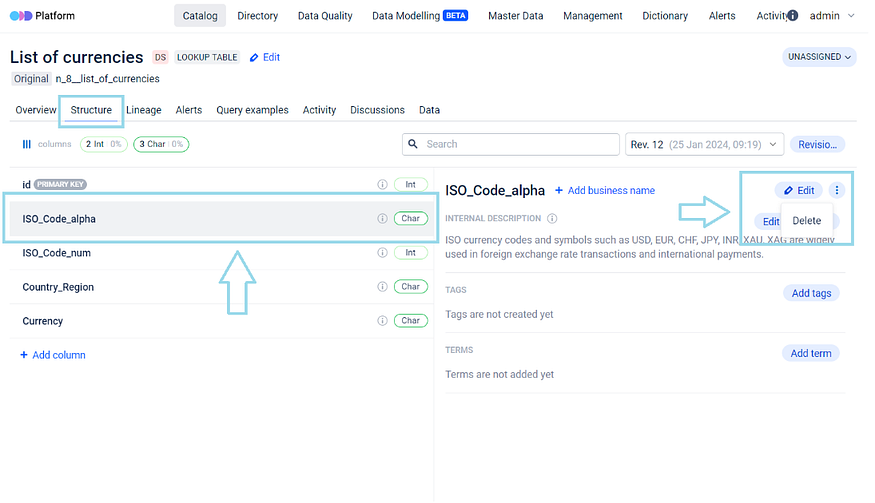
Once a column is created and its corresponding data type is already selected, the alteration of that data type becomes impossible.
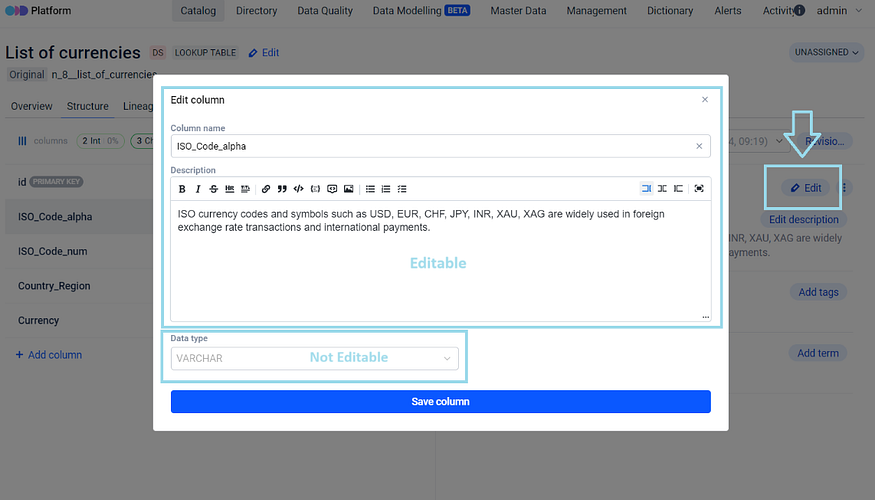
If there is a need to change the data type for a column, a secure approach involves the:
creation of a new column with the desired data type,
transfer of the old column data to the new column, and
deletion of the old column.
This method ensures a secure approach to any data migration.
Each time the table structure is modified, a new revision of structure is generated, allowing table version differences to be tracked.
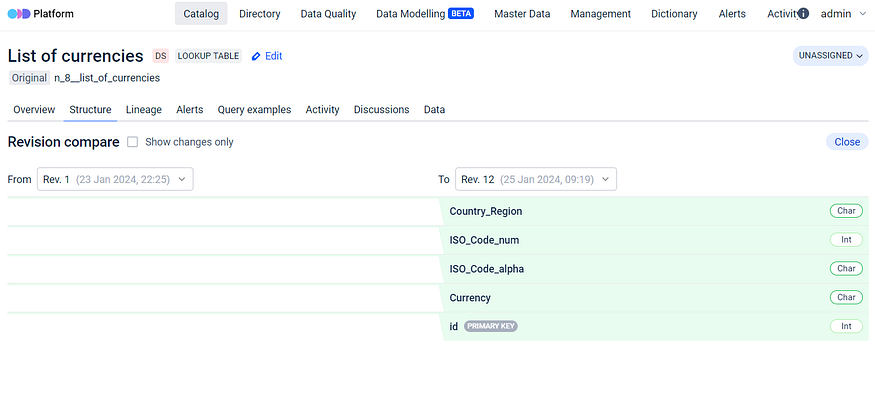
Lookup Tables Data
Within ODD Platform an exclusive Data tab is made available for Lookup Tables. It displays a table with headers that mirror the structure of Lookup Table, which is created in the Structure tab. When a column is added in the Structure tab, its appearance in the Data tab is immediate.
Data values can be inputted into the table columns by clicking on [+] button within the Data tab.
This table has a flexible structure, allowing addition of multiple diverse columns.
Even after filling in the columns with data, the table structure remains customizable, i.e. it is still possible to edit, add or delete its columns. The filled in data is also subject to be edited or deleted.
The information entered into the table resides in a separate schema within the database.
Lookup Table vs regular Data Entity
The Lookup Table is essentially the same as regular Data Entity in ODD. The key difference lies in the fact that for a standard data entity there is no direct ability to modify its structure while for a lookup table the interaction with the structure becomes possible.
All the actions possible with the structure in any other data entity, such as adding Descriptions, Tags, Terms and Business Names can be performed both with Lookup Table itself and its columns also.
Also, the ID column, marked as the Primary Key, is automatically generated and cannot be modified. While the Primary key is currently unchangeable, there are plans for future developments that will enhance user experience by allowing interaction with it.
Lookup Table Data Access
Access to the data in the Lookup table is available by the distinct schema within PostgreSQL, and it can also be accessed via an API. Access via an API is currently considered not the most user friendly or recommended method, because with this access for example only column IDs are accessible and not their corresponding names. Nevertheless, assistance from our team is available to users in configuring access, ensuring that additional data can also be made available through the API in such cases. Table data availability within PostgreSQL: For all of its features ODD Platform uses PostgreSQL database and PostgreSQL database only.
Database connection defining block would look like this:
Within PostgreSQL, ODD Platform database comprises two primary schemas:
public — this schema contains the essential resources of the ODD itself;
lookup_tables_schema — this schema contains all the lookup tables created by the user. Users can interact with these tables just like any other regular tables within the database.

Placing them in a separate schema is a matter of convenience, aimed to simplify the management of these tables particularly during migration like activities. This approach ensures a clear separation between user tables and service tables, allowing for independent handling and manipulation.
Integration Wizards
We provide our users the “Assistant” to facilitate the creation of configuration files. The existing tool for setting up implemented adapters is known as “Integration Wizard” and it serves as an “Integration Quick Start”.
Users can generate a piece of configuration file using this tool, then simply copy and paste it into the ODD Collector configuration file. For example, setting up a collector for PostgreSQL is as much easy as simply clicking on the corresponding wizard and by that gaining access to general information outlining the necessary actions and steps.
This intuitive UI generates a template recognizing that each unique Data Source inherently possesses its distinct set of required fields. To initiate template generation you only need to fill in the necessary fields.
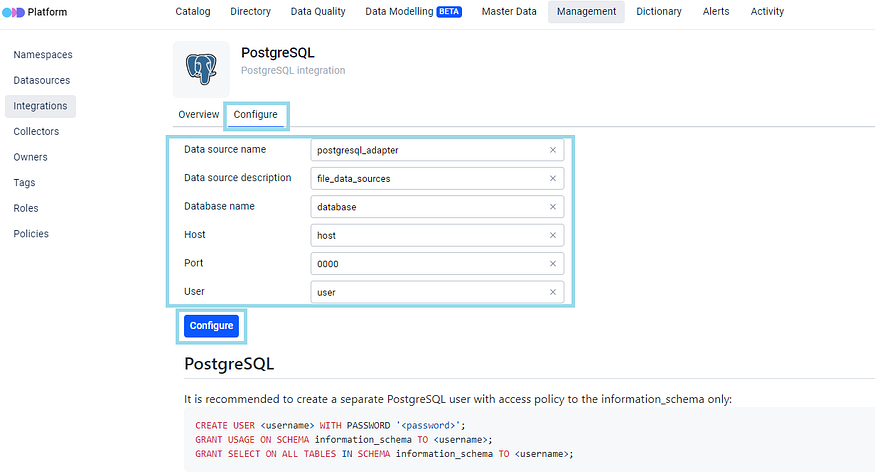
After that a template will be generated.
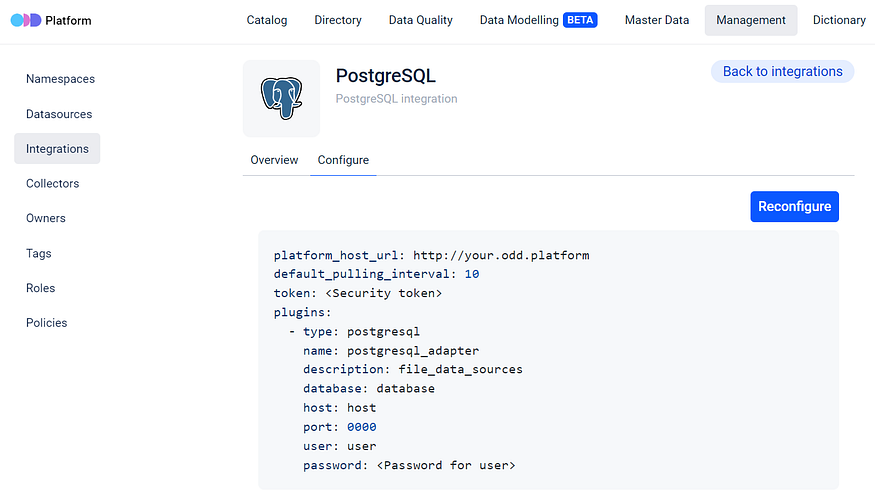
Copy and paste it into your configuration file.
Data Entity Attachments
This feature seamlessly integrates files and links to files into metadata entities, providing an additional layer of functionality.
Step 1. Go to the Overview page of any Data Entity and click on the Add attachment icon:
Step 2. Either drag and drop the file into the attachment window or browse to select and attach a file:
As illustrated there are no limitations on the types of files that can be attached to metadata entities, with the exception of size — the attachment size should not exceed 20MB. This flexibility enables the attachment of various types, including images, CSV files, PDFs, TXT files and more. The logic behind this functionality shares similarities with Jira Tickets, allowing the provision of additional information related to a task through the attachment of relevant materials. However, if attaching the file itself is not preferred or if the file exceeds the 20MB limit, ODD provides the option to attach a link to a remotely stored file. This process is also very straightforward.
Step 3. To attach a link, insert the link and provide a customized name for clarity. It’s also possible to attach multiple links simultaneously by clicking on the +Add link icon:
The file and link are now attached to the data entity:
Effortlessly Delete attached files and Edit/Delete the attached links
️Regarding editing and deleting the attachments, both actions can be easily performed by clicking on the respective icons.
File Storage is Configurable in ODD
Additional flexibility is provided in ODD to configure file storage according to preferences, allowing a choice between local and remote storages:
Saving files on disk, which is the default option, and
Using an S3-compatible storage like AWS S3, Minio, etc.
For customization refer to the application.yml file:
It is crucial to emphasize that a single data entity has the capability to accommodate multiple files and links.
“Recommended” panel on the main page
Note: to be able to see the “Recommended” panel on the ODD's main page the User-Owner Association shall be implemented first. More details can be found in ODD’s User-owner association documentation. This synchronization is beneficial for authentication and authorization purposes and unlocks features such as the one we introduce here.
The “Recommended” section comprises four wizards: My Objects, Upstream Dependencies, Downstream Dependencies and Popular.
These wizards offer quick access to recently used data and indicate the freshness of displayed data entities. An orange “time” icon signals stale entities within the platform and the icons to the right indicate what type of entity you have there. Feature functionality allows easy access to recently viewed data entities and is being updated as new data is ingested into the platform.
My Objects displays the most recently ingested five data entities where the user is mentioned as an owner;
Upstream Dependencies gathers data entities that serve as “direct origins” to those for which user is the owner in the platform;
Downstream Dependencies collects the entities that are “direct targets” of those for which user is the owner;
Popular presents the most viewed or used data entities by both current and other users of the platform.
The interactive dashboard not only displays last used entities but also allows navigation to their structure page for more details with a simple click. Designed to save time and recall recent actions, this feature enhances user experience with the ODD Platform.
Metadata stale
The term “stale metadata” refers to the situation where the metadata becomes outdated within ODD Platform. This indicates a lack of information regarding updates from the source, which could occur due to issues such as collector not functioning as planned, the collector being deactivated or other issues in the source data system that result in the unavailability of that metadata. In the event that metadata becomes stale, ODD allows users to easily identify the stale metadata, clearly marking it with an icon. Additionally, by hovering over that orange icon of the watch it is possible to see when the metadata was last refreshed.
By default, the refresh period is set to 7 days in the configuration file:
This indicates that if the platform received information from the source over 7 days ago, the item would be labeled as “Stale” within the platform. ODD users have the flexibility to adjust this period to better suit their needs — whether opting for a shorter or longer timeframe.
Machine-to-Machine (M2M) tokens
There are two ways available to interact with the backend without dealing with the UI. The first one is to get the user’s session token right from the request and use it. By doing so you simulate the way of authenticated users interaction with the API. Here we use a particular user identity, which comes with certain limitations and drawbacks. For instance, if we don’t intend to operate on behalf of any existing user we’re required to create a technical user within the identity provider. Note: in this case the user’s session expiration time has to be set to a very long period, which may not align with certain security compliance standards.

There is also another option available to communicate with API in case of M2M. We decided to provide the ODD Platform with a specific secret before the platform deployment. Then, without relying on identity providers, if a user request is sent to the API with the specified secret, the response will be generated without any barriers. Essentially, we keep this secret, i.e. token as an environment variable in our configuration:
auth.s2s.enabled: true
auth.s2s.token : stringExample
Note: 1. this setup is designed for a single user to whom an Admin role is granted; 2. while logged as an Admin using this token, users won’t be able to login to the platform as Admin via UI.

Any request providing this secret will gain administrative access to the platform with an infinite token lifetime and all the security considerations lie on the user in this case. This functionality is not the preferred method and is disabled by default, but it can be enabled and configured when needed.

Just keep in mind to secure this connection as well, as you can. While there can be many situations when this functionality can seem not very useful, the majority of ODD users find this useful when downloading data from the platform to be transferred elsewhere.
Last updated
